OpenSAK
The open-source geocache management tool for Windows, Linux, and macOS.
01Installation
Linux (Recommended: Automatic Installer)
Paste this single command into a terminal — it handles everything automatically:
curl -fsSL https://raw.githubusercontent.com/OpenSAK-Org/OpenSAK/main/scripts/install-opensak.sh | bashThe installer will check dependencies, clone the repository to ~/opensak, create a virtual environment, and add an application menu entry.
Linux — AppImage
Download OpenSAK-…-Linux-x86_64.AppImage from the Releases page and run it:
chmod +x OpenSAK-*.AppImage
./OpenSAK-*.AppImage
On first launch, OpenSAK offers to add itself to your application menu (Yes / No thanks / Don't ask again). Choosing Yes copies the AppImage to ~/.local/bin/OpenSAK.AppImage and adds a menu entry and icon — no terminal needed afterwards. From then on, updates can be installed from inside OpenSAK with one click (see Updates). Changed your mind? The same option is available later under Settings → Settings… → Advanced → AppImage → Install in application menu.
Linux — Manual
sudo apt install git python3 python3-venv python3-pip libxcb-cursor0
git clone https://github.com/OpenSAK-Org/opensak.git ~/opensak
cd ~/opensak
python3 -m venv .venv && source .venv/bin/activate
pip install -r requirements.txt
python run.py
Windows (Recommended: Microsoft Store)
The easiest and safest way to install OpenSAK on Windows is from the Microsoft Store:
- Free — the same OpenSAK, no account or payment needed beyond the Store itself
- Signed by Microsoft — no SmartScreen warnings on first launch
- Trusted by Smart App Control — never blocked from starting (see below)
- Updates automatically — the Store installs new versions in the background
Open the OpenSAK page in the Microsoft Store, or search for OpenSAK in the Store app, and click Get / Install. OpenSAK then appears in the Start menu like any other app.
Windows — Direct download (alternative)
If you prefer not to use the Store, download OpenSAK-…-Windows.zip from the Releases page, unzip it to a folder of your choice, and run OpenSAK.exe. No Python installation required.
macOS
Download the correct .dmg for your Mac from the Releases page:
| Mac type | File |
|---|---|
| Apple Silicon (M1/M2/M3/M4) | OpenSAK-…-macOS-arm64.dmg |
| Intel | OpenSAK-…-macOS-x86_64.dmg |
Open the .dmg and drag OpenSAK to Applications. The app is signed and notarized by Apple, so it opens normally — no Gatekeeper warning.
System Requirements
| Platform | Requirement |
|---|---|
| Linux | Ubuntu 20.04+ / Linux Mint 20+ / Debian 11+ |
| Windows | Windows 10 or newer |
| macOS | macOS 11 (Big Sur) or newer |
| Disk space | ~500 MB (includes PySide6/Qt) |
Uninstalling
Uninstalling OpenSAK removes the program only. Your databases and settings are never deleted unless you explicitly choose to remove them.
| Installed from | How to uninstall |
|---|---|
| Microsoft Store | Settings → Apps → Installed apps in Windows, find OpenSAK, and choose Uninstall |
| Windows direct download | Delete the folder you unzipped OpenSAK into |
| Linux AppImage | Settings → Settings… → Advanced → AppImage → Uninstall OpenSAK. Choose Remove program only (keeps your data) or Remove program and all data, which asks you to confirm a second time |
| macOS | Settings → Settings… → Advanced → Uninstall → Uninstall OpenSAK. Choose Remove program only (keeps your data) or Remove program and all data, which asks you to confirm a second time. OpenSAK closes and moves itself to the Trash. Dragging OpenSAK from Applications to the Trash also works, but leaves your data behind |
02First Launch & Setup
When OpenSAK opens for the first time, a welcome dialog will offer to open Settings. It is recommended to do this now.
Setting Your Home Point
The home point is your reference coordinate for distance calculations and map centering. Go to Settings → Settings… (Ctrl+,), then in the User Locations section:
- Enter a name (e.g. Home).
- Enter your coordinates in any supported format (e.g.
N55 47.250 E012 25.000, decimal degrees, or DMS). - Click Save point. The point appears in the table above.
- Click ★ Activate to make it the active home point.
Setting Your Geocaching Username
Go to Settings → Geocaching.com tab. Enter your Geocaching.com username. This is used to identify your own caches in the list and for FTF (First to Find) detection in your logs.
03Importing Caches
OpenSAK works with GPX files and Pocket Query ZIP files — the same files you already download from Geocaching.com. No special export step is needed.
Downloading a Pocket Query (Recommended)
- Log in to geocaching.com.
- Go to Play → Pocket Queries.
- Run or create a Pocket Query for your area.
- Download the
.zipfile — do not unzip it.
Importing into OpenSAK
There are three ways to import:
- Menu: File → Import GPX / PQ zip… (Ctrl+I)
- Toolbar: Click the Import button
- Drag & drop: Drag one or more
.gpx,.zip, or.locfiles directly onto the OpenSAK window
In the Import dialog you can add multiple files at once and choose which database to import into. Click Start import. After import, a summary shows new caches, updated caches, and any errors.
Importing Pocket Queries by E-mail
If your Pocket Queries arrive as .zip attachments in a mailbox — for example from a PQ club or PQ service — OpenSAK can fetch and import them directly, without downloading and unzipping by hand.
- Go to Settings → Settings… → PQ Email and enter your mailbox's IMAP server, port, SSL/TLS setting, username and password. Click Test connection to check the login.
- Go to File → Check for PQ Email… and click Check now.
Every e-mail with a .zip attachment is treated as a Pocket Query. Each zip is imported into the database with the same name if one exists, otherwise into the active database. Two options in the check dialog:
- Only check new (unread) e-mails — skips e-mails already imported earlier. An e-mail is only marked as read once something from it has actually been imported, so a failed import is retried next time.
- Delete the e-mail after a successful import — off by default. A failed import always leaves the e-mail in place.
Auto-geocoding
After import, OpenSAK automatically runs an offline reverse-geocode pass to fill in Country, State/Region, and County for any caches that are missing these fields. This works with no internet connection, and is enabled by default — no setup required.
Supported Formats
| Format | Extension | Notes |
|---|---|---|
| Pocket Query ZIP | .zip | Recommended — includes full logs and waypoints |
| GPX | .gpx | Single-file or Groundspeak-enhanced GPX |
| LOC | .loc | Lightweight coordinate-only format |
Importing from a GSAK Database
Switching from GSAK? You don't have to re-download everything as GPX first. File → Import from GSAK Database… reads a GSAK backup ZIP or a raw sqlite.db3 file directly, bringing in caches, waypoints, attributes, corrected coordinates, personal notes, trackables, and your full log history — not capped the way a GPX/PQ export is.
[image: filename.ext] placeholders, since those files live on your old machine and can't travel with the database.04Main Window Layout
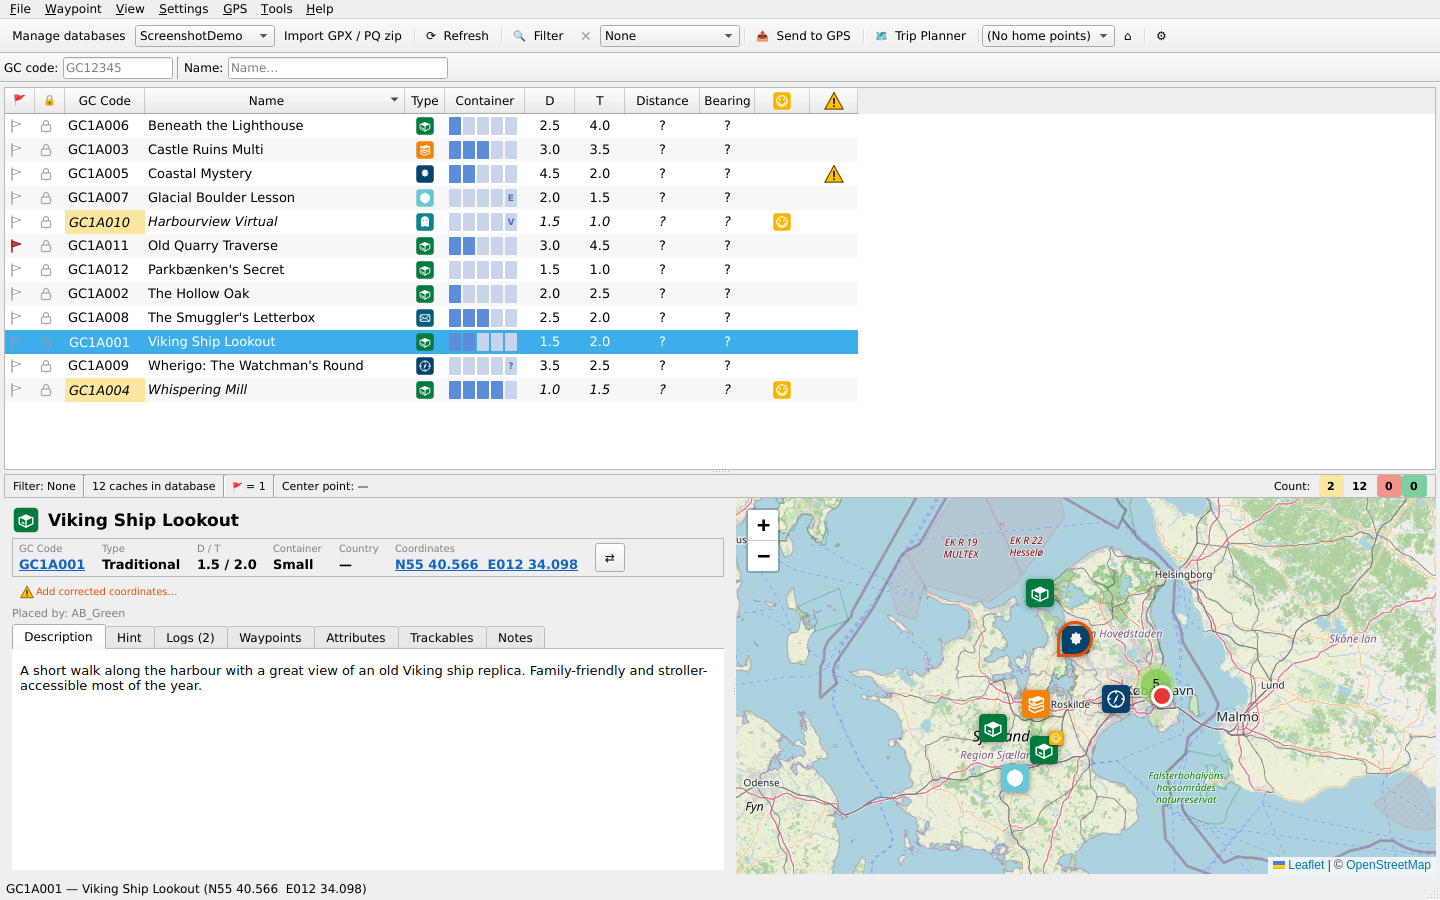
The window is divided into three main areas, all resizable by dragging the dividers:
- Cache List (top) — full-width table of all caches matching the active filter
- Cache Detail Panel (bottom-left) — full description, hint, attributes, and logs for the selected cache
- Map (bottom-right) — interactive OpenStreetMap with colour-coded cache pins
05Cache List
Columns
The cache list shows up to 17+ configurable columns. Choose which ones are visible via View → Choose columns… Click any column header to sort — click again to reverse the sort order. The sort is saved per database.
Clicking a Cache
Clicking a row selects the cache: the detail panel updates to show its full information, and the map pans to its pin. Double-clicking a row opens the cache on geocaching.com in your browser — the same as GSAK.
Right-Click Context Menu
Right-clicking a cache in the list shows:
- Open on geocaching.com — opens the cache page in your browser
- Copy coordinates — copies coordinates to clipboard
- Mark as found / unfound
- Toggle flag 🚩 — flag caches for batch operations
- Lock cache / Unlock cache 🔒 — protect against being overwritten by a later import
- Edit cache… — opens the edit dialog
- Add corrected coordinates… — enter solved coordinates for mystery caches
- Edit corrected coordinates… / Clear corrected coordinates
Sortable Columns (examples)
| Column | Description |
|---|---|
| GC Code | Geocaching.com identifier |
| Name | Cache name |
| Type | Traditional, Mystery, Multi, etc. — icon, name as text, or both, via Choose columns… |
| D / T | Difficulty and Terrain rating (1.0–5.0) |
| Distance | Distance from active home point (Haversine or Vincenty, see Settings → Advanced) |
| Size | Nano/Micro/Small/Regular/Large |
| Found | ✓ if marked as found |
| Hidden date | Date cache was placed |
| Placed by | Cache owner name |
| Favorite pts | Community favorite points |
| Trackables 🐞 | Number of trackables (travel bugs/geocoins) logged in the cache |
| 📍 | Corrected coordinates set indicator |
| FTF 🥇 | First to Find indicator |
| Flag 🚩 | User flag for batch operations |
| 🔒 | Locked against import overwrites |
06Cache Detail Panel
The bottom-left panel shows all information for the currently selected cache.
Tabs
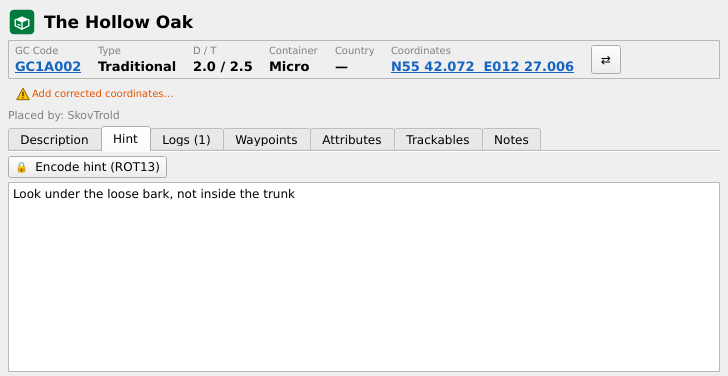
- Description — full HTML cache description as published on geocaching.com
- Hint — encrypted hint; click the Decode hint (ROT13) button to toggle decoding
- Logs — recent logs from all finders; includes a search box to find specific entries. Links in log text are clickable.
- Attributes — all Groundspeak attributes set on the cache (dogs, parking, etc.)
- Notes — your own free-text notes for this cache, separate from the published description and logs. Round-trips with GSAK: a note survives export → GSAK → re-import.
- Trackables — travel bugs and geocoins logged in the cache, each with a clickable
coord.infolink. - Waypoints — child waypoints belonging to this cache (e.g. parking, stages), with prefix, type, name, coordinates, description and comment for each. Caches with waypoints show their name in bold in the cache list, and the waypoints appear as separate markers on the map when the cache is selected.
The cache type icon is shown next to the title, and a 🔒 icon appears if the cache is locked.
Locking a Cache
Right-click a cache → Lock cache, or check the box in Edit cache…. Locking freezes the cache's own fields — name, type, container, coordinates, D/T, owner, status, descriptions, hint, country/state/county — so a later GPX/PQ re-import can't overwrite them. Logs, attributes and waypoints still refresh normally on re-import. A 🔒 column in the cache list shows locked status at a glance, and you can filter on it (see All Filter Types).
Clickable Elements
- GC code — click to open the cache page on geocaching.com
- Coordinates — click to open in your chosen map app (Google Maps or OpenStreetMap)
- Corrected coordinates — if set, shown with an ✏️ edit button and a 🗑 clear button; click the coordinates to open in map app
07Map
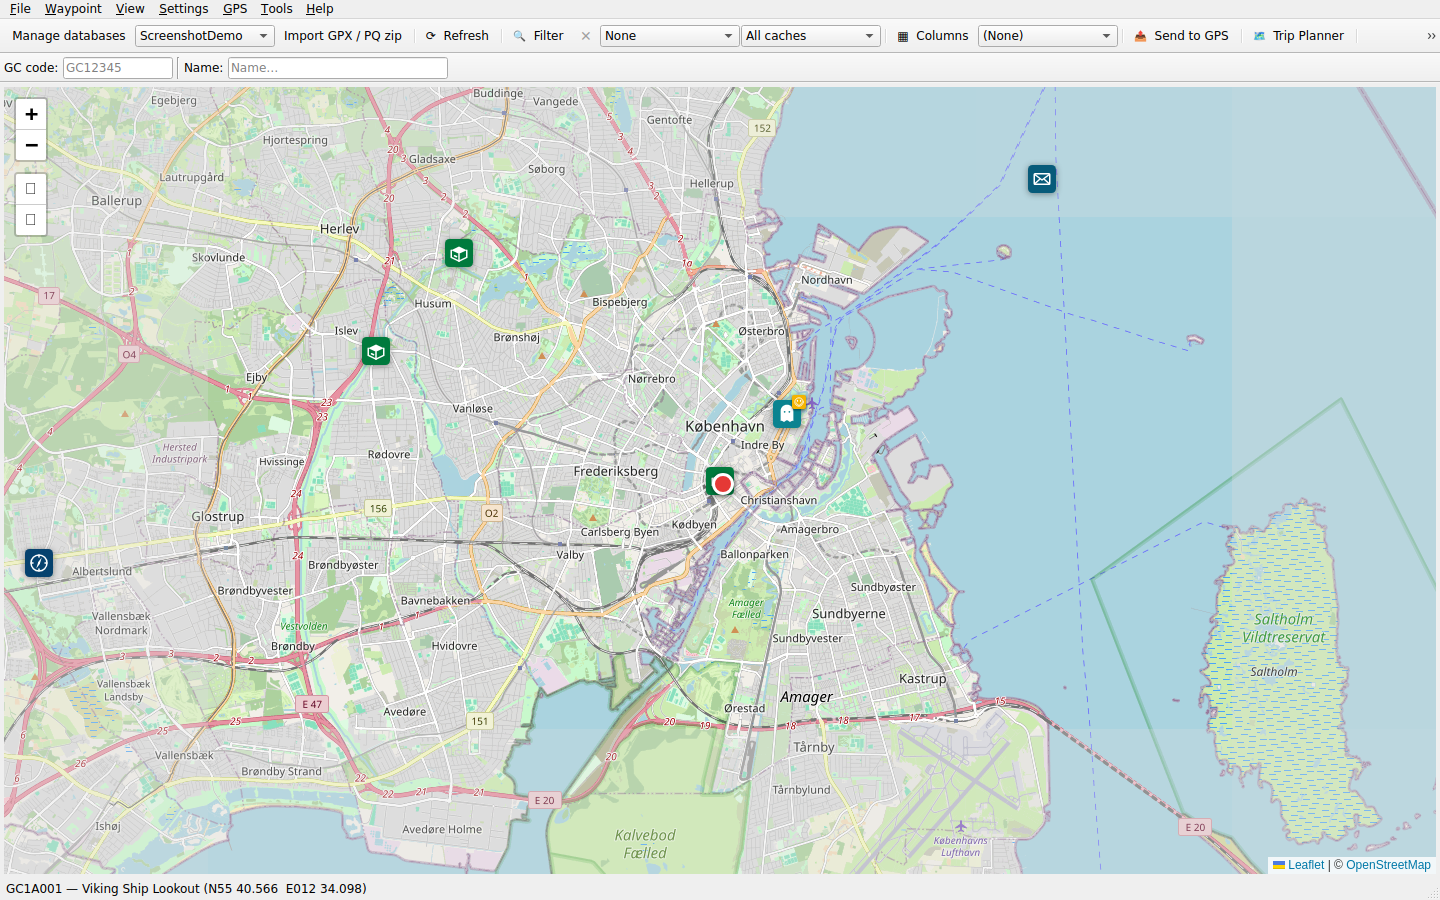
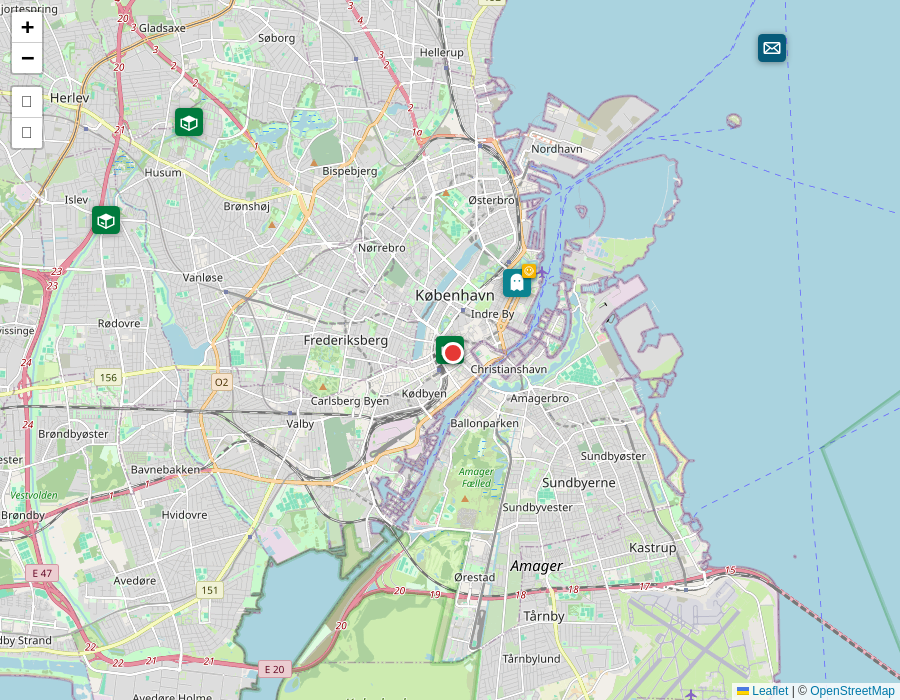
The map uses OpenStreetMap tiles via Leaflet.js. It always shows the caches currently visible in the cache list (respecting the active filter).
Pin Colors
Interactions
- Click a pin to select that cache — the detail panel and list row update accordingly.
- Pins cluster automatically when zoomed out; click a cluster to zoom in.
- Corrected coordinates are shown as a separate pin (📍) linked to the original.
- Use the ⌂ button in the toolbar to pan the map to your active home point.
Maximize & Pop-out
Two ways to work with a bigger map, both reachable from the two small buttons in the map's own corner, the toolbar, or the View menu:
- ⛶ Maximize map (F11) — expands the map to fill the whole main window, hiding the cache list and detail panel. Press F11 again, or click the button again, to restore the normal 3-panel layout.
- ⧉ Pop out map (Ctrl+Shift+M) — opens the map in its own floating window, so it can be moved to a second monitor while the main window keeps the cache list and detail panel. The pop-out window's size and position are remembered between sessions. Closing it, or pressing Ctrl+Shift+M again, docks the map back into the main window.
08Info Bar
The narrow bar between the cache list and the detail/map panels gives a quick status overview at all times.
| Element | Meaning |
|---|---|
| Filter: … | Name of the active filter profile, or None |
| N filters active | Number of filter conditions currently applied (instead of a generic "Active" label) |
| N caches in database | Total caches in the active database (ignoring filter) |
| 🚩 = N | Number of flagged caches in the current filter |
| Centre point: … | Name of the active home point |
| N | Found caches — black text on yellow, matching the GC Code column's found color |
| N | All caches in the current filter (white/default) |
| N | Inactive caches (archived + disabled) — black text on red |
| N | Your own caches — black text on green, matching the GC Code column's owned color |
09Search & Quick Filters
Search Bar
The search toolbar sits below the main toolbar and is always visible. Three independent fields:
- GC: search by GC code (partial match, case-insensitive)
- Name: search by cache name (partial match, case-insensitive)
- Where: a raw SQL WHERE condition, e.g.
distance < 5— the same syntax as the Where tab in the Filter dialog. Press Enter to apply it; clear the box to remove it. Recent entries are kept in the dropdown for quick reuse.
The GC and Name fields update the list live as you type. Clearing a field immediately resets that search.
Quick Filter Dropdown (in menu bar)
A fast single-click filter in the menu bar:
| Option | Shows |
|---|---|
| All caches | No filter applied |
| Not found | Caches you have not marked as found |
| Found | Caches you have marked as found |
| Available (not found) | Active caches you have not found |
| Traditional — easy (D≤2, T≤2) | Easy traditional caches only |
| Archived | Archived caches only |
10Filter Dialog
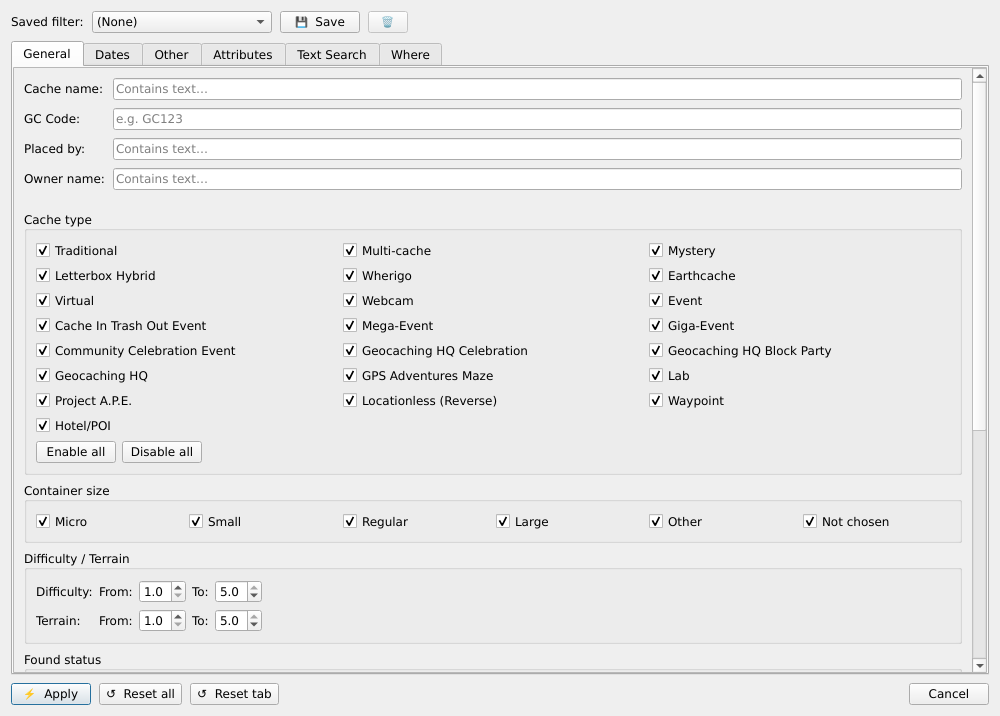
Open with View → Set filter… or Ctrl+F, or click the 🔍 Filter button in the toolbar.
AND / OR Logic
All filters default to AND mode — a cache must pass every active filter to appear. Switch the group to OR to show caches matching any filter. Groups can be nested for complex conditions.
Filter Tabs
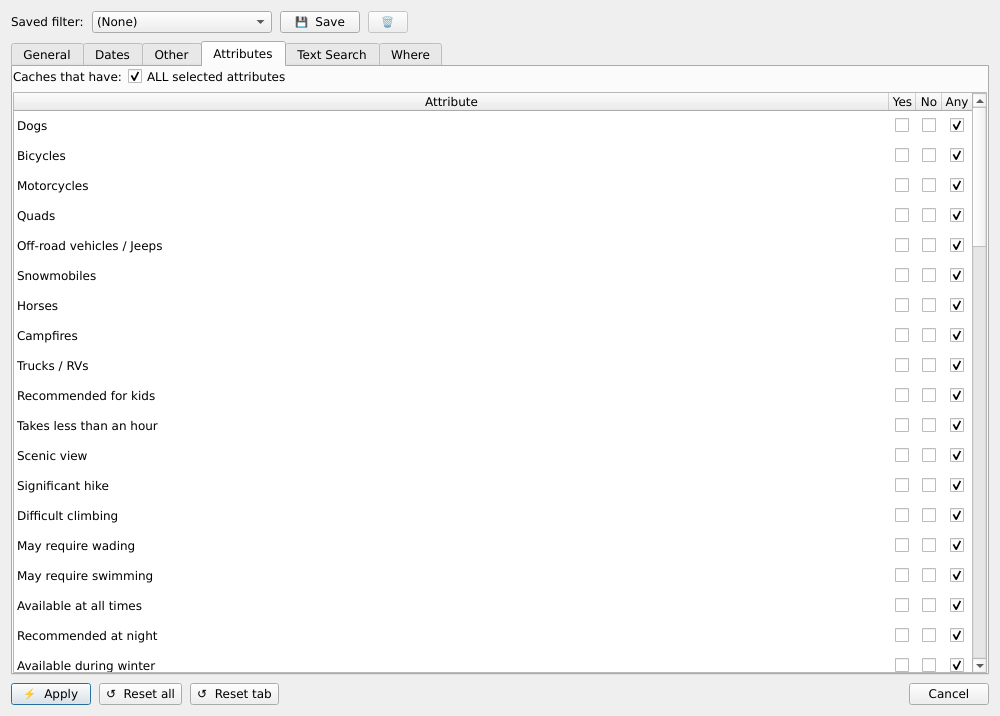
The filter dialog has ten tabs, modelled on GSAK's filter dialog:
- General — name, GC code, placed by, owner, type, container, difficulty, terrain, found/not found, availability, premium, corrected coords
- Dates — eight date fields (see All Filter Types), each with its own condition
- Other — country, state, county, user data 1–4, GC.com note, personal note, user flag, DNF flag, FTF flag, favorite points, elevation, locked, and a block with one shared centre point for distance, direction, and how far corrected coordinates lie from the posted ones
- Logs — filter by the logs on a cache: which logs, what type, who logged them, and how many
- Line/Polygon — caches near a route or track, near a set of points, or inside a polygon
- Child Waypoints — filter by a cache's child waypoints (code, type, name, comment, date, count)
- Trackables — has / has no trackables, and filter by trackable name, tracking code and count
- Attributes — all ~70 standard Groundspeak attributes, with Yes/No/Any per attribute, a search box, and AND/OR matching
- Text Search — search descriptions, logs, and personal notes with the full set of text operators, including RegEx
- Where — raw SQL WHERE clause against the caches table (advanced)
Seeing What a Filter Restricts
Every setting that differs from its default is highlighted, and so is every tab that contains one — so when you open a saved filter you can see at a glance what it actually restricts. Reset tab and Reset all clear the values and the highlighting together.
Inverting a Filter
Tick Invert filter (next to the Reset buttons) to flip the whole filter: the list then shows exactly the caches the filter would otherwise hide. For example, Traditional, difficulty ≤ 2 inverted shows every cache that is not an easy Traditional. The checkbox is highlighted while it is on, is saved with a filter profile, and is cleared by Reset all (not by Reset tab, since it belongs to no tab). With no conditions set, inverting has no effect.
An inverted filter is checked cache by cache rather than in the database, so on very large databases it can take a little longer to apply.
Clearing the Filter
Click the red ✕ button in the toolbar, or go to View → Clear filter. The button turns grey when no filter is active.
11All Filter Types
| Filter | Description |
|---|---|
| Cache type | Traditional, Multi, Mystery, EarthCache, Letterbox, Event, CITO, Mega-Event, Wherigo, Virtual, Webcam, Lab Cache |
| Container size | Nano, Micro, Small, Regular, Large, Very Large, Other, Virtual |
| Difficulty | Range 1.0–5.0 in 0.5 steps |
| Terrain | Range 1.0–5.0 in 0.5 steps |
| Found / Not found | Filter on found status |
| Availability | Available, Unavailable (disabled), Archived — toggled independently |
| Distance | Distance from a centre point — your home point, a saved point, the selected cache or a custom coordinate — with Equal, Less than, At most, More than, At least, Between or Not between. Unit follows your km/mi setting. Filters saved with the older Min/Max fields still select the same caches |
| Name | Cache name — any of the 12 text operators (below) |
| GC code | GC code — any of the 12 text operators |
| Placed by | "Placed by" name — any of the 12 text operators |
| Owner | Owner username — any of the 12 text operators |
| Country / State / County | Any of the 12 text operators |
| User data 1–4 / GC.com note | GSAK's four User data fields and the personal cache note synced from geocaching.com — any of the 12 text operators |
| Personal note | The text of your own note (Notes tab) — any of the 12 text operators. Use empty / not empty for a simple yes/no check; filters saved with the old Yes/No checkboxes are converted automatically |
| Direction | Direction from the centre point, either as a bearing in degrees (0° = north, clockwise) with the same operators as Distance — Between runs clockwise, so 315°–45° is the sector through north — or by clicking compass directions (N, NE, E … NW), which fills in the matching degree range. Direction filters saved in earlier versions still match from your home point until edited |
| Attribute | Any of ~70 Groundspeak attributes, Yes/No/Any — all must match (AND) or any may match (OR) |
| Trackables | Has / has no trackables, plus trackable name and tracking code (text operators) and count (Any, Equal, At least, At most, Between). Name and code must match on the same trackable; Count equal 0 finds caches without a matching trackable |
| Premium / Non-premium | Membership requirement |
| Has corrected coords | Caches with solved coordinates set |
| No corrected coords | Caches without solved coordinates set |
| Distance corrected ↔ posted | How far the corrected coordinates lie from the posted ones, in metres (feet with miles selected), with the same operators as Distance. Caches without corrected coordinates never match |
| User flag | 🚩 flagged / not flagged |
| DNF | Did Not Find flag set/not set |
| FTF | First to Find flag set/not set |
| Locked | Cache is locked against import overwrites — yes/no |
| Favorite points | Community favorites, with the same operators as Distance. Caches without favorite points count as 0 |
| Elevation | Elevation in metres (feet with miles selected), with the same operators as Distance. Caches with unknown elevation never match. Filters saved with the older from/to range for favorite points or elevation are converted automatically |
| Dates | Last found, Hidden date, Found by me date, DNF date, Creation date, Last GPX update, Latest log date, Changed date — each with on or before / on or after / equal / between, "during" or "not during" the last N days/weeks/months/years, or compared with another date field. Creation, Last GPX update and Changed date also accept a time |
| Logs | Which logs are searched (all, or only each cache's latest / last N), log type or Found / Not found / Other, log date, who logged it (text operators or numeric user ID), and how many matching logs are required (at least / at most / equal / between), with Include/Exclude |
| Child waypoints | Code, type, name, comment, date, created-by-user, and count — all criteria must hold for the same waypoint |
| Line / Polygon / Points | Caches within a distance of a line (route or track) or of a set of points, or inside a polygon. Enter points by hand, read them from a GPX/KML/TXT/CSV file, or add all user-flagged caches. Can be inverted with Exclude |
| Text search | Searches cache descriptions, logs, and personal notes (hint text excluded by default) with any of the 12 text operators. A positive operator matches if any searched field matches; a negated one (e.g. not contains) only if none does. RegEx searches are slower than plain text |
| WHERE clause | Raw SQLite expression against the caches table |
Text Operators
Name, GC code, Placed by, Owner, Country, State, County, User data 1–4, GC.com note, Personal note, the child-waypoint and trackable text fields, the Logs tab's "logged by" field and Text Search all offer the same 12 operators:
| Operator | Matches when the field… |
|---|---|
| contains / not contains | includes (or doesn't include) the text anywhere |
| equals / not equals | is exactly (or isn't) the text |
| starts with / ends with | begins or ends with the text |
| in list / not in list | is (or isn't) one of several values |
| empty / not empty | has no value (or has one) |
| regex / not regex | matches (or doesn't match) a regular expression |
Matching is case-insensitive and works with accented and non-Latin characters.
Common Filter Recipes
| Goal | Filters |
|---|---|
| Family day trip | Not found + Difficulty ≤ 2 + Terrain ≤ 2 + Available |
| Mystery caches to solve | Type = Mystery + Not found |
| Nearby traditionals | Type = Traditional + Distance ≤ 5 km + Available |
| Caches with parking | Attribute: Parking nearby = yes |
| All unfound incl. archived | Not found + Availability: all three checked |
| Specific owner | Placed by contains [name] |
| Power trail | Attribute: Power trail = yes + Available |
| No find in the last year | Logs tab: Log types = Found it + Log date during 1 year + Exclude |
| Latest log is a DNF | Logs tab: Logs to search = Latest + Not found only |
| Caches without a parking waypoint | Child Waypoints tab: Type contains "Parking" + Count equal 0 |
| Caches along a route | Line/Polygon tab: Line, load the route from a GPX file, distance 0.5 km |
| Solved finals outside the 2-mile rule | Other tab: Distance corrected ↔ posted, More than 3219 m |
| Caches north of home | Other tab: centre point = your home point, Direction Between 315° and 45° (or click NW, N and NE on the compass) |
| Caches without a geocoin | Trackables tab: Name contains "coin" + Count equal 0 |
| Everything except easy traditionals | Type = Traditional + Difficulty ≤ 2, then tick Invert filter |
12Filter Profiles
Save and reload filter combinations with a single click.
Saving a Profile
- Open the filter dialog and configure your filters.
- Click Save profile.
- Enter a name (e.g. Easy day trip) and confirm. If a profile is already selected, its name is suggested.
If a profile with that name already exists, OpenSAK asks before replacing it.
Loading a Profile
Either open the filter dialog and select the profile from the dropdown, or use the filter profile dropdown in the toolbar — selecting a profile there applies it immediately without opening the dialog.
Profile files are stored in a filters folder inside OpenSAK's installation folder. Help → OpenSAK File Locations… shows exactly where that is on your computer.
13Databases
OpenSAK supports multiple separate SQLite databases. Each database has its own cache list, home point, and filter profile history.
Managing Databases
Open the Database Manager with File → Manage databases… (Ctrl+D) or click the Manage databases button in the toolbar.
Creating a New Database
- Click New Database.
- Choose a location and filename.
- The database is created and becomes the active database.
Adding Databases You Already Have
Click Open existing… to add a single database file, or Scan database folder… to list every OpenSAK database in your database folder that isn't in the list yet. All of them are ticked; untick any you don't want and click Add Selected. The Welcome Wizard offers the same when the database folder you choose already contains databases, for example after a reinstall or on a new computer.
OpenSAK never scans the folder by itself, so a database you removed from the list stays removed until you add it again. Files that aren't OpenSAK databases, and databases from a newer OpenSAK version, are not offered.
Switching Databases
Either double-click a database in the manager, or use the database dropdown in the toolbar to switch instantly without opening the dialog.
Each database keeps its own home location, column layout, sort order and last-used filter profile. They are stored inside the database file, so they stay with it when you copy, move, rename or restore it.
Copying and Moving a Database
Copy… makes a copy of the selected database under a new name. Move… moves it to another folder under the same name, for example from a USB stick to your internal disk. Both ask for the folder, show the file that will be created, and refuse to overwrite a file that is already there. The folder you chose is remembered until you close OpenSAK, which makes several copies to the same USB stick quick.
Move only deletes the original once the copy has been checked. If the original can't be deleted — for example on read-only media — OpenSAK uses the new copy and tells you where the old file is. You can move the database you are working in; OpenSAK carries on with it at the new location without a restart.
When a Database Is Unavailable
If the database you used last is on a USB stick or network drive that isn't connected when you start OpenSAK, OpenSAK opens another database from your list (or a new Default database) and tells you which one was missing. The missing database stays in the list, marked as not found, so you can switch back to it once the drive is connected again.
Backing Up
Use File → Back up now… to make a backup of your databases together with your settings, filter profiles, column views and custom icons. All databases are selected by default; untick any you want to leave out.
Backups go into a backup folder, by default Documents/OpenSAK Backups. You choose it in the Welcome Wizard, and can change it under Settings → Advanced → Folders or in the same dialog. Existing backups stay where they are when you change the folder. A folder on another disk, an external drive or a synced folder is the safest choice, because it also protects your data if your computer's disk fails. OpenSAK won't store backups inside its own data or database folder.
Each backup is a separate, dated folder, so you can keep as many as you like. Backups you make this way are never deleted by OpenSAK.
Compressed backups. Under Settings → Advanced → Backups you can turn on Compress backups (off by default). Each new backup is then a single .zip file instead of a folder, typically a third or less of the size. Writing it takes noticeably longer — about four times as long as a normal backup — and while it is being written there must be room for one database uncompressed as well as the zip. Existing backups are left as they are, and both kinds can be restored with File → Restore from backup…. You can also open the zip with your operating system's own tools to get a database out by hand.
When a new OpenSAK version has to update a database to a new format, it first saves a copy of the database as it was, and tells you where. Once you have chosen a backup folder, these copies go into its pre-migration subfolder; otherwise they go into a backups folder next to the database. If the backup folder is on a drive that isn't connected, the copy goes next to the database instead, so the update is never held up. You only need these copies if something went wrong, and OpenSAK never deletes them.
The message about the copy offers Apply to all databases when other databases in your list are also from an older version. It backs up and updates them all in one go, so you aren't asked again each time you switch to one.
Backing Up When You Close OpenSAK
When you close OpenSAK and something has changed since your last backup, OpenSAK asks whether to back up first. Click Back Up and Close to back up all your databases and settings, Not Now to close without a backup, or Cancel to keep OpenSAK open. If nothing has changed since the last backup, OpenSAK closes without asking.
A large backup can take a while; a progress window shows how far it has got, and Cancel stops it without leaving a half-finished backup behind. If the backup folder is on a drive that isn't connected, choose another folder in the same window, or close without a backup.
Tick Don't ask again to remember your answer: OpenSAK then always backs up on close, or never asks. You can change this, and how many automatic backups to keep (5 by default), under Settings → Advanced → Backups. Only the oldest automatic backups are deleted; backups made with File → Back up now… are kept until you delete them yourself.
Restoring a Backup
Use File → Restore from backup… to bring a database back. Pick a backup from the list (newest first), tick the databases you want, and click Restore. Use Browse to open backups stored in another folder.
A restored database is always added as a new database, named for example Denmark (restored 2026-10-01) — nothing you have now is ever overwritten. It opens exactly as it was when the backup was taken, with its own home location, columns and sort order. Filter profiles from the backup that you have since deleted are added back; profiles you still have are left as they are.
A backup made with a newer version of OpenSAK can only be restored after updating OpenSAK.
Restoring your settings. Tick Also restore settings to bring back your preferences, filter profiles, column views and icons from the backup — useful on a new computer, or after a settings change you regret. You can also restore only the settings, with no database ticked. It is off by default, and OpenSAK asks you to confirm. Your database list, your folders, your backup settings and the window layout are kept as they are now, since they belong to this computer.
Before anything changes, your current settings are saved as a backup marked Settings before restore, which is never deleted automatically — restore that one to go back. The restored settings take effect the next time OpenSAK starts; OpenSAK offers to close right away, and settings you change before then are replaced.
Useful Multi-Database Patterns
| Pattern | Example |
|---|---|
| One database per region | Copenhagen, Jutland, Holiday area |
| My Finds database | Import your My Finds PQ here for found-status updates |
| Trip database | Created by Trip Planner for a specific outing |
14Waypoints & Manual Caches
You can manually add, edit, and delete caches in your database — useful for custom waypoints or entries not available via GPX import.
Adding a Cache Manually
Go to Waypoint → Add cache… (Ctrl+N). Fill in the GC code, name, type, coordinates, and other fields, then click Save. The entry is assigned an auto-generated CWxxx code if you leave the GC code blank.
Editing a Cache
Select a cache and use Waypoint → Edit cache… (Ctrl+E), or right-click → Edit cache…
Besides name, type, coordinates and descriptions, you can edit owner name, hidden / found / DNF dates, county, elevation, and whether the descriptions contain HTML. Unticking Found or DNF also clears the matching date. The Personal tab holds the user flag, user data 1–4, GC note, watch, your personal note, and corrected coordinates.
The Waypoints tab lets you add, edit and delete child waypoints, including prefix, code, date, comment and flag. A prefix is required, and a waypoint code already used by another waypoint of the same cache is rejected. The detail panel and map update as soon as you save.
Deleting a Cache
Select a cache and press Delete, or go to Waypoint → Delete cache… A confirmation dialog prevents accidental deletion.
15Corrected Coordinates
For mystery and puzzle caches, store the solved final coordinates separately from the listed coordinates. Corrected coordinates are used for GPS export, trip planning, and map display.
Adding Corrected Coordinates
Right-click the cache in the list → 📍 Add corrected coordinates… (or click the Add corrected coordinates button in the detail panel).
Enter the solved coordinates in any supported format (DMM, DMS, or decimal degrees). The original coordinates are preserved and shown alongside the corrected ones.
Editing or Clearing
Right-click → 📍 Edit corrected coordinates… or ✕ Clear corrected coordinates. The ✏️ and 🗑 buttons in the detail panel also work.
16Marking Caches as Found
Marking a Single Cache
Right-click the cache in the list → Mark as found (or Mark as unfound to reverse it). The found date is set to today.
Auto-detection During Import
When importing a Pocket Query, OpenSAK automatically detects your finds by looking for your own log entries in the imported GPX data. The found status and found date are set without any extra step — as long as your Geocaching.com username is set in Settings.
FTF Detection
First to Find status is also detected automatically during import: OpenSAK scans your own log entries for FTF keyword patterns (e.g. "FTF", "First to Find", "First Find") and sets the FTF flag accordingly.
17Updating Finds from "My Finds"
For the most accurate found status, use a My Finds Pocket Query. This works even for caches found before you started using OpenSAK.
- On geocaching.com, go to Play → Pocket Queries and download your My Finds zip.
- Create a dedicated database in OpenSAK called My Finds and import the zip into it.
- Switch back to your main database.
- Go to Settings → Update finds from reference database…
- Select the My Finds database as the reference.
- OpenSAK matches GC codes and marks all matching caches as found.
18Flags
The 🚩 flag is a personal marker you can set on any cache. Flags are saved in your local database and not shared or affected by imports.
Toggling a Flag
Right-click a cache → Toggle flag 🚩, or click in the 🚩 column directly.
Flag Count
The info bar shows the current count of flagged caches in the active filter (🚩 = N). The status bar also shows a count when you toggle a flag.
Batch Operations on Flagged Caches
- Waypoint → 🚩 Delete flagged caches… — delete all flagged caches in the current filter (with confirmation)
- Waypoint → 🚩 User flags → Set flag on all caches in filter… — flag every cache currently shown in the list (with confirmation)
- Waypoint → 🚩 User flags → Clear flag on all caches in filter… — remove the flag from every cache currently shown in the list (with confirmation)
- Waypoint → 🚩 User flags → Clear all flags in database… — remove all flags from the entire active database, regardless of the filter
You can also filter for flagged/unflagged caches using the User flag filter in the filter dialog.
19Deleting Caches
Three delete operations are available under the Waypoint menu:
| Action | What is deleted |
|---|---|
| Delete cache… (Del) | The selected cache only |
| Delete flagged caches… | All 🚩 flagged caches in the current filter |
| Delete all caches in filter… | Every cache currently shown (respects the active filter) |
20Send to GPS
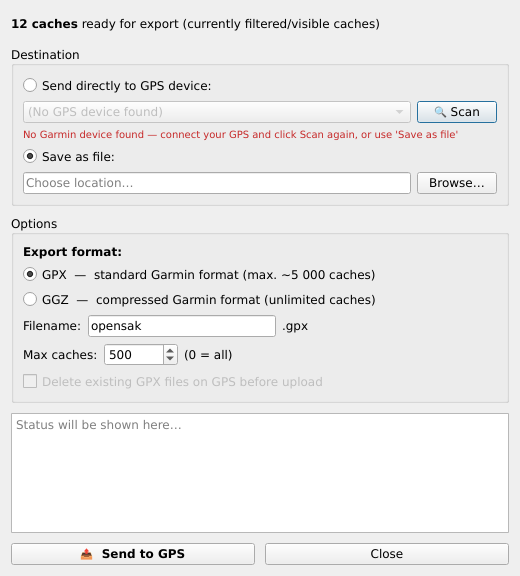
Export the currently filtered caches directly to a Garmin GPS device (USB storage or Windows MTP) or save them to a file.
Open with GPS → Send to GPS… (Ctrl+G) or the 📤 button in the toolbar.
Sending to a Garmin Device
- Connect your Garmin device via USB (mass storage or MTP).
- Select Send directly to GPS device.
- Click 🔍 Scan to detect Garmin devices.
- Select your device from the list.
- Choose a format — GPX or GGZ (see below).
- Click Send.
GPX caches are written to the Garmin/GPX/ folder on the device; GGZ caches go to Garmin/GGZ/.
Saving as a GPX File
Select Save as GPX file, choose a location, and click Send. This is useful for devices that are not automatically detected, or for copying to another location.
Export Options
- Choose GPX or GGZ format
- Choose how many logs per cache to include
- Corrected coordinates are exported as the primary coordinate (original stored separately)
21File Export (GPX / LOC / GGZ)
Export your filtered caches to standard geocaching file formats via File → Export:
| Format | Best for |
|---|---|
| GPX | Full export with descriptions, logs, and waypoints — compatible with most GPS apps |
| LOC | Lightweight coordinate-only format for basic GPS devices |
| GGZ | Garmin's compressed format — unlimited caches per export, matches GSAK's GGZ layout byte-for-byte |
All exports use the caches currently visible in the list (respecting the active filter). You can limit the export to the first N caches, and choose whether caches with corrected coordinates are exported with those or with their original coordinates.
Set the Folder and File name once and later exports go straight there, without a save dialog. The file name can be fixed text or use variables, for example {database}_{date}: {database}, {filter}, {center}, {date}, {time}, {datetime}, {format} and {count}, among others — the info button next to the field lists them all, and a preview shows the exact file that will be written. If the file exists decides whether OpenSAK asks, overwrites or skips.
Save the dialog's settings under a name with Export settings and load them again later; OpenSAK also remembers the settings you used last.
22Export to Google Maps (KML)
Export your filtered caches as a KML file for viewing in Google Maps.
Go to File → Export → Export to Google Maps (KML)…
Options
- Include custom waypoints (parking spots, stages, finals)
- Include caches you have already found
Importing into Google Maps
- Go to maps.google.com/d
- Create a new map
- Click Import layer and upload the KML file
23Trip Planner
Plan a geocaching outing by selecting the best caches from your current database. Open with GPS → Trip Planner (Ctrl+T) or the 🗺️ button in the toolbar.
Radius Mode
Select caches within a circle around your home point:
- Set the number of caches for the trip
- Set a maximum radius (or 0 for no limit)
- Sort by distance, difficulty, terrain, placement date, or name
- Optionally filter to unfound and/or available caches only
Route Mode (A → B → … )
Select caches along a driving route:
- Add up to several waypoints (hotel, rest stop, destination)
- Add points from your saved home points
- Set a corridor width (max distance from the route)
- Caches are sorted in driving order along the route
Exporting the Trip
From the Trip Planner you can:
- 📤 Send to GPS… — directly to a connected Garmin device
- 💾 Save as GPX file… — save the trip as a GPX
- 🗺️ Show on map — preview selected caches on an interactive map
- 🗄️ Save to database… — save the trip caches to a new or existing OpenSAK database
24Coordinate Converter
Open with Tools → Coordinate Converter (Ctrl+K).
Convert between coordinate formats: Degrees-Minutes-Seconds (DMS), Decimal Minutes (DMM), and Decimal Degrees (DD). If a cache is selected, its coordinates are pre-filled.
Paste any coordinate string in any format — the converter detects the format automatically and displays the equivalent in all three formats.
25Coordinate Projection
Open with Tools → Coordinate Projection (Ctrl+P).
Calculate a new coordinate by projecting from a known point at a specific bearing and distance. Useful for multi-caches where a stage gives you a bearing and distance to the next point.
- Enter or paste the starting coordinate
- Enter the bearing (0–360°) and distance (meters or km)
- The projected coordinate is shown and can be copied
26Digit Checksum
Open with Tools → Digit Checksum…
Calculates the digit sum (and iterated digit sum) of one or more numbers. Used in many mystery cache puzzles where you calculate coordinates from the sum of digits in other numbers.
27Midpoint
Open with Tools → Midpoint…
Calculate the geographic midpoint between two coordinates. Enter coordinates A and B; the result is shown in all three coordinate formats and can be copied to the clipboard.
28Distance & Bearing
Open with Tools → Distance & Bearing…
Calculate the great-circle distance and forward/reverse bearing between two coordinates. If a cache is selected, point A is pre-filled.
| Output | Meaning |
|---|---|
| Distance | Straight-line (great-circle) distance in km and miles |
| Bearing A → B | True bearing from point A to point B |
| Bearing B → A | True bearing from point B back to point A |
29Settings
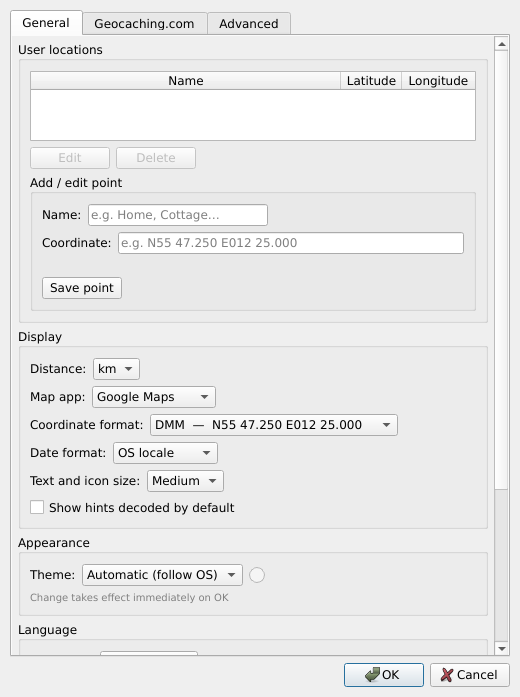
Open with Settings → Settings… (Ctrl+,) or the ⚙ button in the toolbar.
General Tab
| Setting | Description |
|---|---|
| User Locations | Add, edit, activate, and delete named home points |
| Show distances in miles | Switch distance display from km to miles |
| Map app | Google Maps or OpenStreetMap (used when clicking coordinates) |
| Coordinate format | DMM, DMS, or Decimal Degrees — used throughout the interface |
| Date format | OS locale, dd.mm.yyyy, mm/dd/yyyy, or yyyy-mm-dd |
| Text and icon size | Small, Medium, or Large — affects the cache list grid (font and row height), the detail panel, and the tab labels |
| Show hints decoded by default | Skip the decode-click and show hints already readable when you open a cache. Off by default (hints start hidden, as before). |
| Theme | Automatic (follow OS), Light, or Dark |
| Language | Choose UI language (restart required) |
Map Tab
Turn the map on or off, limit how many caches the map shows (nearest to your active home point first — much faster on large databases), and set the radius and cache limit for the split-screen map around the selected cache.
Geocaching.com Tab
| Setting | Description |
|---|---|
| Username | Your geocaching.com username — used for find detection and FTF detection |
| Home location | Your Geocaching.com home location (shown as the ★ Home point) |
PQ Email Tab
The mailbox OpenSAK checks for Pocket Query e-mails: IMAP server, port, SSL/TLS, username and password, plus a Test connection button. See Importing Pocket Queries by E-mail.
Advanced Tab
Folders
Shows the current installation folder (read-only), the database folder and the backup folder. The database and backup folders can be changed directly here — no need to go through the setup wizard again.
| Setting | Description |
|---|---|
| Database folder | Change where new and existing databases are stored. If existing databases are found in the old location, you're asked whether to move them along (keep originals, delete originals, or leave them and only use the new folder for future databases) |
| Backup folder | Where backups are stored (see Backing Up). OpenSAK refuses a folder inside its own data or database folder. Changing it doesn't move existing backups, and no restart is needed |
| Run setup wizard again | Re-opens the first-run welcome wizard at any time, e.g. to change language, installation folder or backup folder |
| Setting | Description |
|---|---|
| Search min chars | Minimum characters before the search fires (0 = adaptive) |
| Search debounce (ms) | Delay before search fires while typing (0 = adaptive) |
| Check for updates automatically | Background update check at startup |
| Notify me about beta releases too | Only relevant if you're on a stable release — off by default. When on, you're also checked against the latest beta and offered whichever is newer. |
| Distance calculation method | Haversine (default) or Vincenty (WGS84) — Vincenty is up to ~0.3% more accurate over long ranges, at a small performance cost |
AppImage (Linux only)
Shown only when running the Linux AppImage. Install in application menu adds OpenSAK to your menu (useful if you chose Don't ask again on first launch), and Uninstall OpenSAK removes it again — see Uninstalling.
Uninstall (macOS only)
Shown only in the macOS app. Uninstall OpenSAK moves OpenSAK to the Trash and lets you choose whether to keep or delete your caches, databases and settings — see Uninstalling. If OpenSAK is running straight from the disk image, or you don't have permission to change the folder it's in, you'll be asked to drag it to the Trash in Finder instead.
Custom Icon Packs
Want cache-type or found-smiley icons that look different from the bundled set? Click Open icons folder to reveal a folder alongside your settings file where you can drop replacement SVG files — no code changes or rebuilding required. File names must match the bundled assets exactly; click View icon naming guide for the full list of file names, recommended canvas sizes, and export tips. A missing or invalid custom file automatically falls back to the bundled default — it's never a crash. This folder lives alongside your settings, so it survives future OpenSAK updates.
30Choosing Columns
Go to View → Choose columns… to select which columns appear in the cache list and in what order. Drag rows to reorder, check/uncheck to show or hide.
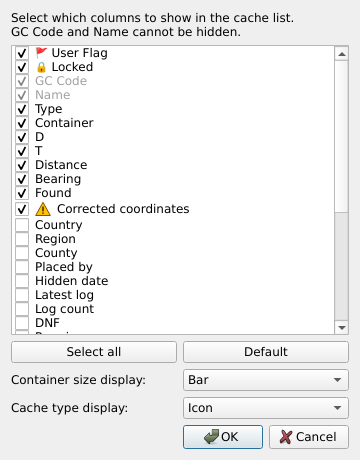
Column visibility and order are saved between sessions.
31Language
Go to Settings → Settings… → General tab → Language. Select your language and click OK. The new language takes effect the next time OpenSAK is started.
Currently supported languages:
Polish and Spanish are a first, machine-translated version — corrections from native speakers are very welcome.
Want to help translate? See CONTRIBUTING.md — it only requires translating a single Python file.
32Theme
Go to Settings → Settings… → General tab → Theme:
- Automatic — follows your operating system's light/dark preference
- Light — always light
- Dark — always dark
The theme change takes effect immediately when you click OK — no restart needed.
33Updates
How OpenSAK is updated depends on how you installed it:
| Installed from | How updates work |
|---|---|
| Microsoft Store | Fully automatic — the Store installs new versions in the background. OpenSAK doesn't show its own update notifications; Help → Check for updates… just tells you whether a newer version exists. |
| Linux AppImage (added to the menu) | Upgrade now downloads, verifies and installs the new version in place. Close and reopen OpenSAK to start it. |
| macOS | Download & Install downloads and verifies the update and replaces the app in Applications. OpenSAK then closes — open it again to start the new version. |
| Windows direct download | Download & Install downloads and verifies the update, then shows it in Explorer so you can unzip it. Consider switching to the Microsoft Store version to get automatic updates. |
Every download is checked against a published SHA-256 checksum before it is used.
Except in the Store version, OpenSAK checks for new versions automatically 5 seconds after startup (can be disabled in Settings). When a new version is found, a notification dialog offers:
- Upgrade now / Download & Install — as described above; on other installations, Open releases page takes you to GitHub instead
- ♥ Support OpenSAK… — opens the project's Open Collective page; doesn't affect your update decision, you can still choose one of the other options afterwards
- Skip this version — suppress notifications for this specific version
- Later — dismiss until next launch
You can also check manually via Help → Check for updates…
34Keyboard Shortcuts
This reference is also available inside the app — go to Help → Keyboard Shortcuts… to see and customize every binding in an editable table, with a "Reset all" button to restore the defaults. Overrides are remembered across restarts.
File & Database
| Shortcut | Action |
|---|---|
| Ctrl+D | Manage databases |
| Ctrl+I | Import GPX / PQ zip |
| Ctrl+Q | Quit |
Cache List
| Shortcut | Action |
|---|---|
| Ctrl+N | Add cache manually |
| Ctrl+E | Edit selected cache |
| Delete | Delete selected cache |
| F5 | Refresh list |
View & Filters
| Shortcut | Action |
|---|---|
| Ctrl+F | Open filter dialog |
GPS & Trip Planning
| Shortcut | Action |
|---|---|
| Ctrl+G | Send to GPS |
| Ctrl+T | Open Trip Planner |
Geocaching Tools
| Shortcut | Action |
|---|---|
| Ctrl+K | Coordinate Converter |
| Ctrl+P | Coordinate Projection |
Settings
| Shortcut | Action |
|---|---|
| Ctrl+, | Open Settings |
35Getting Help
Debug Log
If something isn't working as expected, go to Help → Open log file to find the application log. Including it with a bug report makes the problem much easier to track down. If OpenSAK crashed or hung, Help → Open log from last restart shows the log from the previous session.
File Locations
Help → OpenSAK File Locations… shows every place OpenSAK keeps files on your computer: settings and application data, the startup configuration, your database folder, databases opened from other locations, the saved PQ Email password, and (on Linux) the application menu files. Each row shows whether the location exists and how much space it uses, with an Open folder button. Copy all to clipboard gives you a text summary to paste into a bug report. This window only shows information — it never deletes anything.
| Resource | Link |
|---|---|
| Bug reports & feature requests | github.com/OpenSAK-Org/opensak/issues |
| Community discussion | Facebook group: OpenSAK |
| Releases & downloads | github.com/OpenSAK-Org/opensak/releases |
| Changelog | CHANGELOG.md on GitHub |
| Contributing | CONTRIBUTING.md on GitHub |
| Support the project | opencollective.com/opensak |
| Website | opensak.com |
This guide was generated from the OpenSAK source code (v1.22.0-beta.2). Last updated September 2026.